by Lee Porter
6. March 2014 09:58
We protect your information in a number of ways. Firstly the site role give minimal (User), senior management (Management) and Administrative (Client Admin) access to the site.
Welcome emails are only sent when you are ready to do so. If the user doesn't receive a Welcome email then they can not login in.
Line managers of groups can automatically see and manage the employees in their group, even if they are minimal users.
Furthermore Functionality Roles can be given to minimal users to extend their access into the specific areas that they need to see.
by Lee Porter
5. March 2014 16:12
Sometimes your sickness types that are included in your site by default might need to be changed and now you can by going to Admin > System Functionality > Sickness > Sickness Types. from here you can add new sickness categories and edit and remove existing ones.
by Lee Porter
24. February 2014 11:00
To create an Admin for a group go to the person you want to be the Admin by going to
People > employee name > Person (dropdown) > Work and change
their Home group to the Group that you want them to be the Admin for and submit. Then return to the Home Group area and remove the tick in 'Remove
Old Group' and change the Home group back to what it was - the Managers
real home group - and submit. Now go to Groups in the top menu (the groups of this employee). Here you
need to change the 'Role in group' for the group they are an Admin from Member to Admin which
you can do by clicking the link.
If you want the admin to receive the same emails as the Manager does
then go to Admin > Settings > Email > Email Settings and type
#AllAdminsNotMgr# into 'Inc CC Any Excluding Approval' and then click on
the 'Moved to' link under Sickness an add the same text in the field
'Email Failover - Alt Admin CC'
#AllAdminsNotMgr# in the CC fields for sickness and leave will copy the same emails sent to the Groups Manager to any Admins setup in the Group.
by Lee Porter
20. February 2014 12:56
If you haven't added an Actual Return to work date (and the status is
still Initial report or updated report) then you can remove it by
finding it on the list of sicknesses on the Dashboard and clicking the
Sickness Reference to open it. You will find a Remove button at the
bottom of the Sickness.
If the Return to work date has been added then you will need to Kill
it. To do this you will need to know which employee was sick and the
numerical part of the sickness reference (e.g. SR001234 = 1234). Then
go to Admin > System Functionality > Sickness > Kill Record.
by Lee Porter
20. February 2014 12:14
A user can withdraw leave in the future by clicking the Absence
Ref in the 'My Future Leave Requests' list on their Dashboard. At the bottom of the leave request is a Withdraw Request button.
OR
As a line manager (i.e. a Manager of a Group) they can find their direct reports by going to My Details > Groups and click on an employee.
As a Client Admin (the access you have) or Management Site Role you can access an employee simply by going to People > employee name.
...From there go to Leave > Leave and click on the Future leave request
to cancel. Click the Approved link to open the decision box and change
the decision from Approved to Cancel Request and Submit.
In some cases you will want to cancel leave that falls in the past and
to do that you must be a Client Admin and go to Admin > System
Functionality > leave > Kill Record. You will need to know the
person its for and the numerical part of the Absence Reference (e.g.
Ar001234 = 1234). This extra control on past leave gives you more security in the system.
by Lee Porter
28. January 2014 22:47
Go to Admin > Settings > Calendars > Your Calendars and choose the 'Working Year' Calendar. From this page you will see a list of the years at
the bottom (e.g. 2011 - 2014). To add 2015 you should change the 'Num
periods' from 4 to 5 and Submit. This will add another year to the list
at the bottom of the page. Then you should check to see that the new year includes all the
appropriate Bank Holidays. You can do this by clicking on the Period
name for 2015.
This is the only required yearly task but doing it about now for the next year is
a good idea. Obviously you could add a few years by changing it to 7
for instance but if you go to far ahead the Bank Holidays won't be added automatically
(so you'll have to do this yourself) and this is a good way to restrict
leave being booked too far into the future before you've added rules for
that year or mandatory leave etc.
by Lee Porter
28. January 2014 22:26
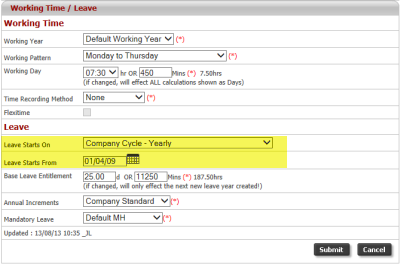
The base leave entitlement is recorded for an employee at People > Employee name > Person (dropdown) > Work and at the bottom of the page
is the field for the Base Leave Entitlement.
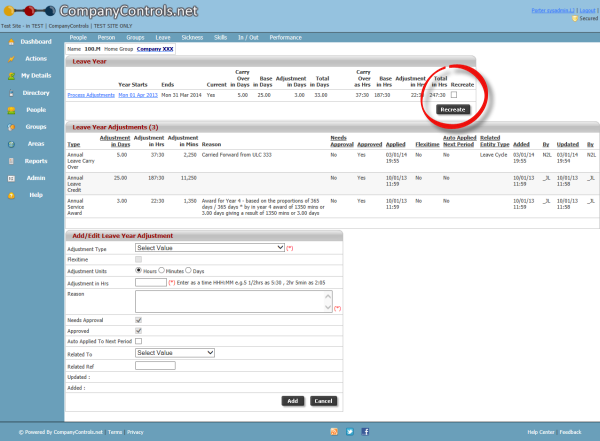
add) OR just add an adjustment to bring
it in line with the Base leave entitlement. To Recreate the leave year
for someone go to People > Employee name > Leave (dropdown) > leave
Years > 2014 and either add an adjustment or just tick the Recreate
checkbox and click the Recreate Button. NOTE: You should recreate a
leave year after updating the Base Leave Entitlement otherwise the newly
added leave year will be added with the same base leave entitlement
figure as it was previously.
To recap the Base leave entitlement field just keeps a record of the employees first year entitlement. This figure should be without any adjustments for the new starter deductions (as the software will do this automatically). When the first and subsiquent Leave Years are created it will look to the Base entitlement to find how much to add.
Changes to a particular year can be done to the leave year with an adjustment.
by Lee Porter
23. January 2014 09:37
When you add a new employee at People > Add the form doesn't ask all the
questions it could (e.g. whats the calendar, work pattern, phone
numbers etc) and instead sets some of this info as it is instructed by
the information at Admin > Settings > Your Defaults.
If this info is going to be wrong (i.e. your adding a Ireland based employee
and your default calendar is set as UK) then you will need to edit the
employee slightly immediately after adding them (e.g. People >
Employee name > Person > Work). Its good policy to check the
details anyway even if you don't expect there to be any changes.
Once you are happy with their details you can release their Welcome Email at Admin > Settings > Email > Welcome Email.
by Lee Porter
17. January 2014 10:58
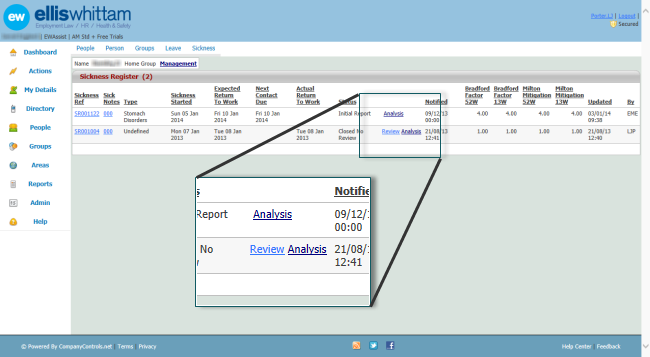
When a Return to Work interview has been recorded you can now access it by going to People > employee name > Sickness.
by Lee Porter
8. January 2014 10:31
The process to change the leave year is as follows.
1. Change the leave year
a) If the leave year is the same for everyone you can update it by
going to Admin > Settings > Your Defaults and find 'Leave starts
on' and change the date. The year in this choice is irrelevant, just the day and month.
b) If the leave year is different for each employee (e.g. birthday,
start date etc) then go to People > employee1,2,3,etc > Person (dropdown) > Work and update the Leave starts on to 'Personal Cycle from date entered' and set the leave Starts on to the appropriate date.
2. Create the leave years
This will create any 2014 leave years that current don't exist. Go to Admin > System Functionality > Leave > Leave Cycles > Bulk Process Adjustments (This year)
3. Check which years had already been created with the wrong start date
Go to Reports > Leave > Users leave > Cycles to see which employees have a wrong leave year with the wrong start date and highlight them
4. Remove and replace with a correct leave year
Go to People > employee with wrong leave year > leave (dropdown)
> Leave Years > Current year (e.g. 2014) and Reset the year by
ticking the Recreate tickbox and clicking the Recreate button. This
will remove the current leave year and replace it with the new one.

 Subscribe